How to Set Up and Run TTI-Miner on Windows: A Complete Guide
Mining on the UPOW blockchain can be a rewarding experience, especially with the right tools. In this tutorial, we'll walk you through the process of setting up and running TTI-Miner on your Windows system. This guide is perfect for those looking to participate in the UPOW ecosystem and contribute to its innovative AI-powered blockchain network.
Prerequisites and Initial Setup
Before we dive into the installation process, ensure you have the following:
- A Windows PC with a compatible GPU
- Git installed on your system
- Python 3.11 installed
Let's begin with the setup process:
Step 1: Clone the Repository
First, you need to clone the TTI-Miner repository from GitHub. Open your command prompt and run:
git clone https://github.com/upowai/TTI-MINER.gitStep 2: Navigate to the Cloned Directory
Move into the cloned directory:
cd TTI-MINERStep 3: Check GPU Compatibility
Verify that your GPU is working correctly by checking the CUDA version.
Step 4: Verify Python Version
Ensure that Python 3.11 is installed on your system. You can check this by running:
python --versionIf you don't have Python 3.11, download and install it from the official Python website.
Step 5: Create a Virtual Environment
It's a good practice to create a virtual environment to manage dependencies:
python -m venv ttiminer_envStep 6: Activate the Virtual Environment
Activate the newly created virtual environment:
ttiminer_envScriptsactivateInstalling Dependencies
With our environment set up, let's install the necessary dependencies:
Step 7: Install Required Packages
Install all required dependencies listed in the requirements.txt file:
pip install -r requirements.txtStep 8: Run the Setup Script
Execute the setup script to download required models and install everything needed for TTI iNode:
python setup.pyRunning TTI-Miner
Now that we have everything installed, let's run the miner:
Step 9: Start the Miner
Run the miner using your wallet address and pool details:
python miner.py --WALLET_ADDRESS "E3sGYEhVznzmjFGv99bhqWQrRoKsbRUuRwYJRHEUtxnek" --MINER_POOL_IP "192.99.7.175" --MINER_POOL_PORT 4403 --ENDPOINT "http://192.99.7.175:9003" --DEVICE 0Make sure to replace the wallet address with your own UPOW wallet address.
Understanding UPOW Blockchain
UPOW, or Useful Power of Work, is a Layer 1 blockchain implementation designed for AI applications. It follows the original Nakamoto consensus and is built for decentralized nodes called iNodes. These iNodes create a market for decentralized useful work, incentivizing participants to provide the best decentralized computations.

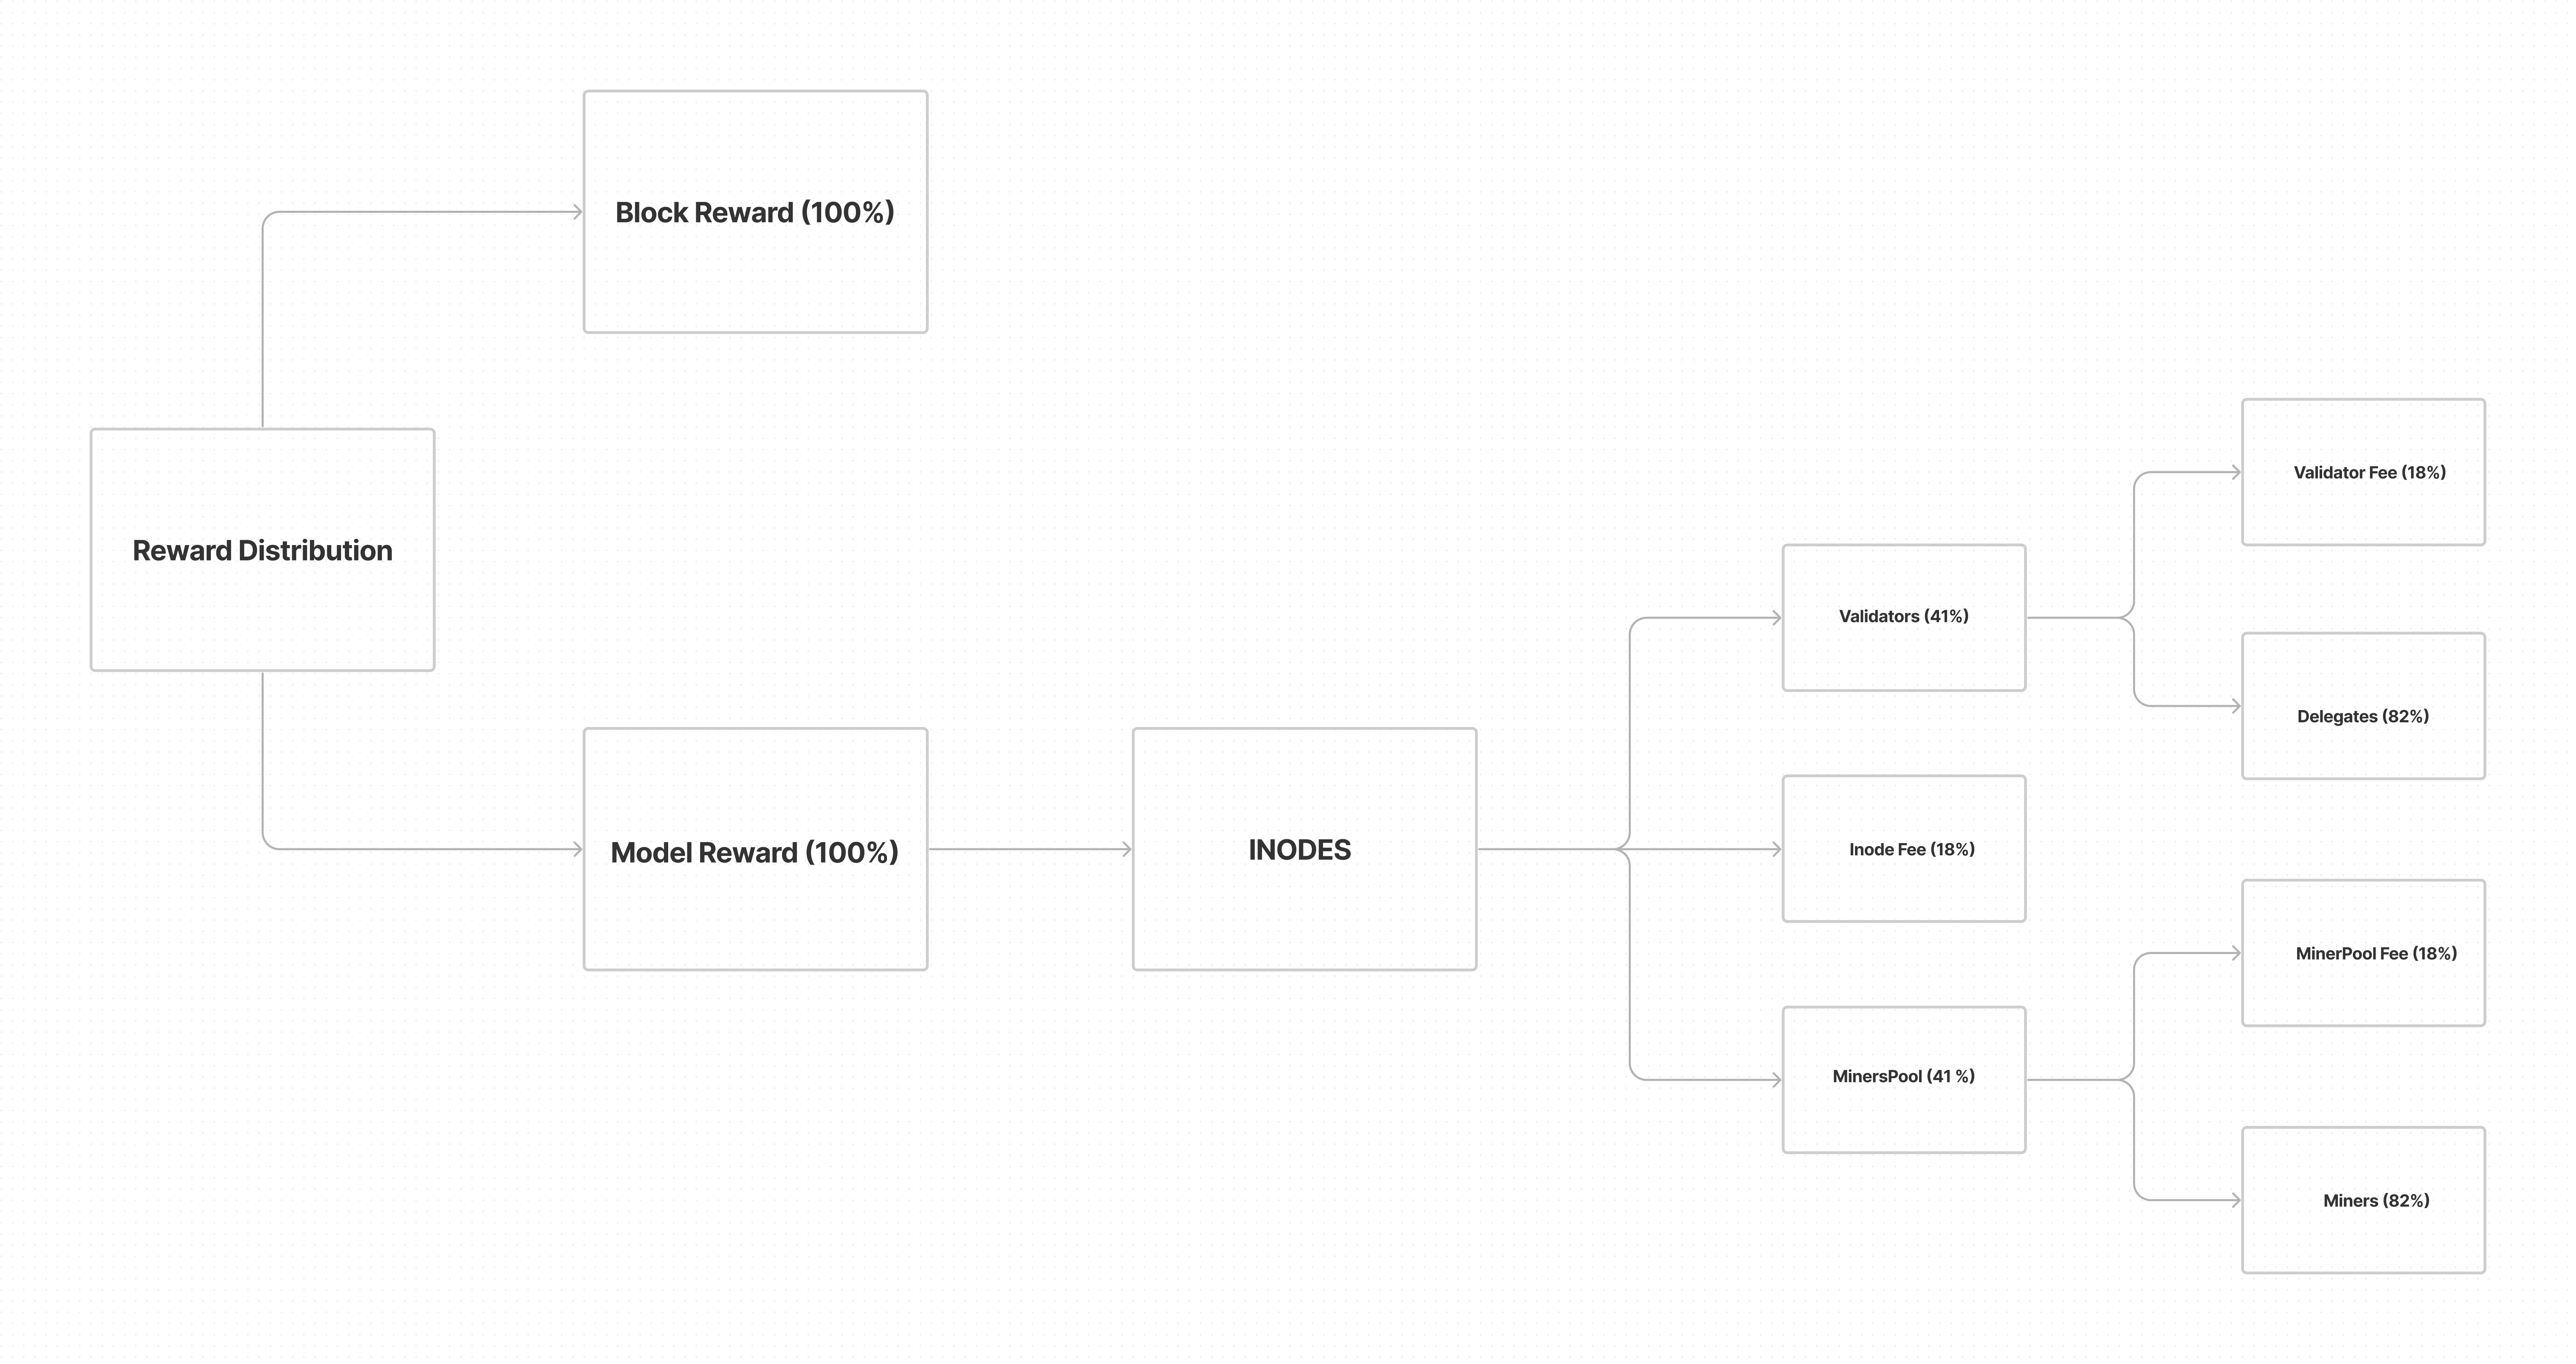
The UPOW blockchain introduces a dual reward system:
- Block Rewards: Similar to traditional blockchains, for creating new blocks.
- AI Rewards: Unique to UPOW, for contributing to AI tasks within the network.

Additional UPOW Network Components
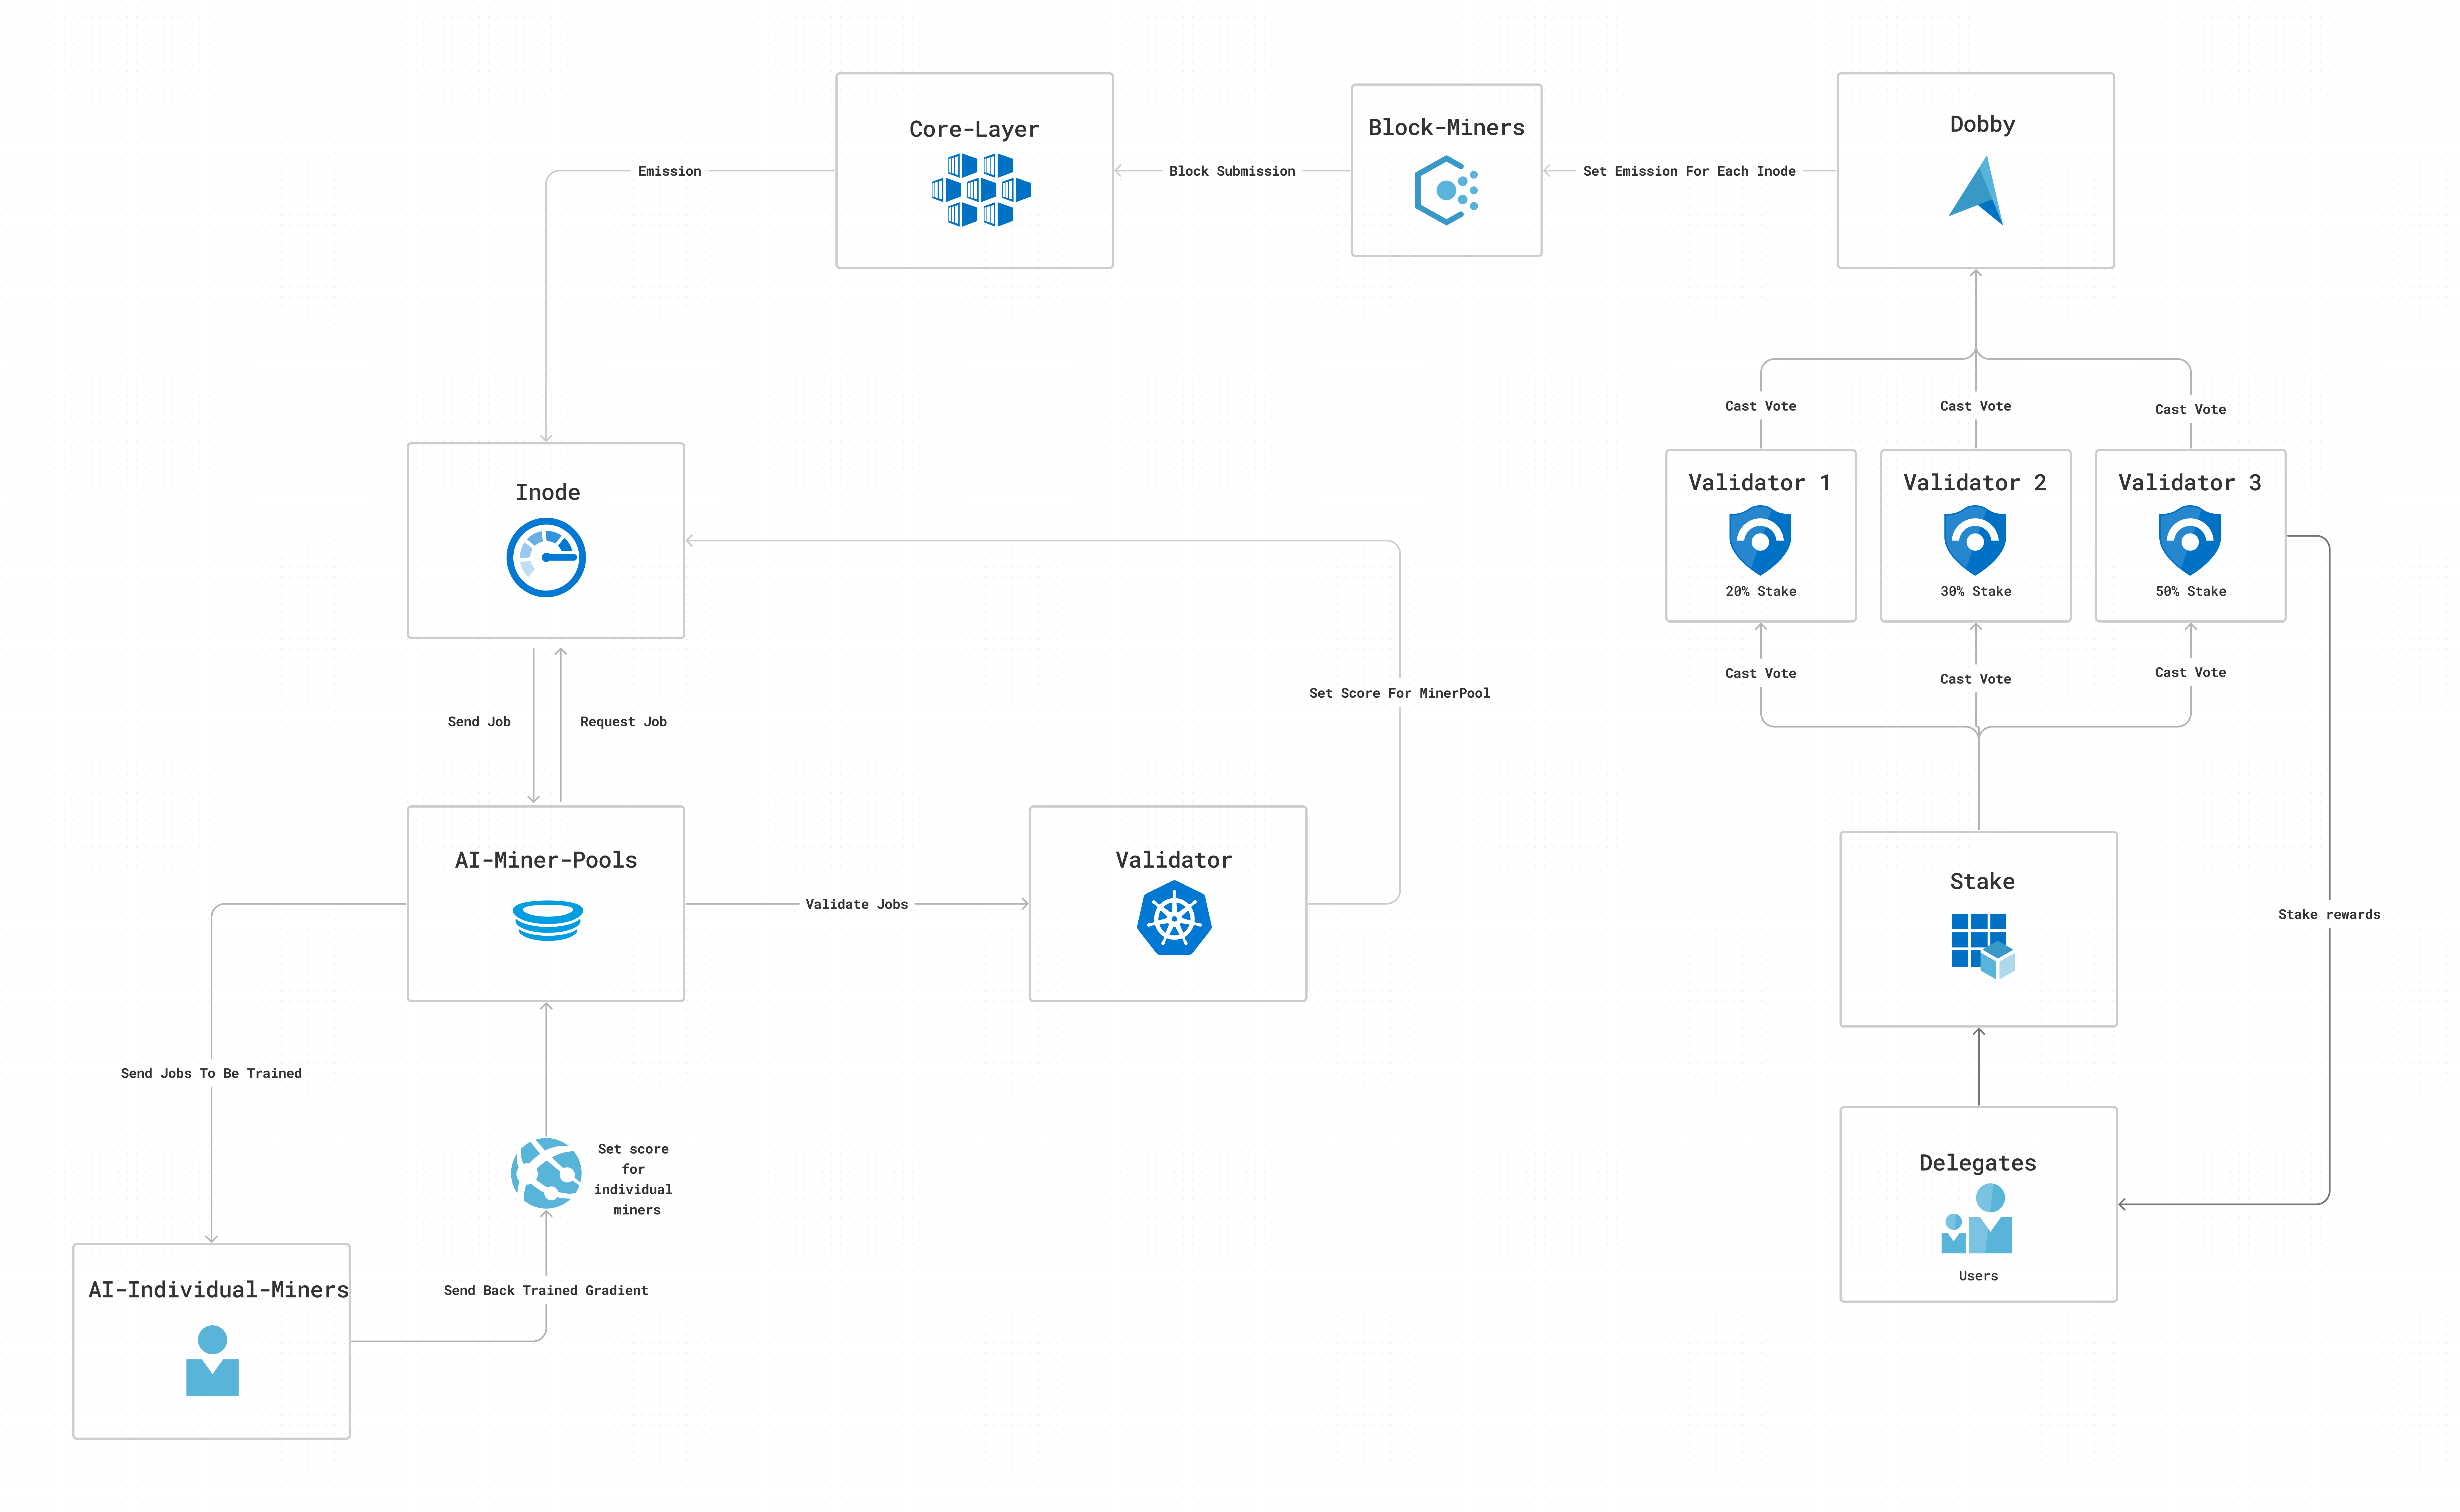
The UPOW network consists of several key components:
- Core Layer (Blockchain Layer): The backbone of the UPOW network.
- iNodes: Incentivized nodes that can be customized or joined.
- Miner Pools: Intermediaries connecting iNodes and individual miners.
- Miners: The backbone of the network, contributing computational resources.
- Validators: Guardians ensuring the integrity of iNodes and miner pools.
- Dobby: An API for storing emission information.
- Master Key: A strategic solution for initial blockchain operations.
- Delegates: Coin holders who stake and participate in network governance.
Creating and Managing UPOW Wallets
UPOW wallets are fundamental for identity management within the ecosystem. Here's how to create and manage your UPOW wallet:
- Clone the wallet repository:
git clone https://github.com/upowai/wallet.git - Install requirements:
pip3 install -r requirements.txt - Create a wallet:
python3 wallet.py createwallet - To send UPOW:
python3 wallet.py send -to [recipient_address] -a [amount] - Check balance:
python3 wallet.py balance
By following this guide, you should now have TTI-Miner set up and running on your Windows system, ready to participate in the UPOW network. Remember to stay updated with the latest developments in the UPOW ecosystem to maximize your mining potential.
Keywords for SEO: UPOW blockchain, TTI-Miner, Windows mining setup, AI blockchain, cryptocurrency mining, UPOW wallet, blockchain rewards, decentralized computing, GPU mining, Python mining setup.